Guide
Van electrical system basics
Updated October 22, 2026. Prices checked on the makers' own sites that day.
Disclosure: We may earn a commission if you buy through these links. It never changes what we recommend or what the tools calculate. How we make money.
The six parts
- Battery bank. Usually lithium (LiFePO4) now. A Redodo 12V 200Ah Plus (opens in a new tab) was $449.99 when we checked: 2,560 Wh, enough for a weekend van's two days.
- Charging. Three ways in: solar panels through a charge controller (a 40 A MPPT (opens in a new tab) is $144.99), the engine's alternator through a DC-DC charger (the Redodo 40 A (opens in a new tab) is $175.99), and shore power through a plug-in charger.
- Protection. A main fuse at the battery, a battery switch to cut everything off, and a fuse on every positive wire where it leaves a bus bar.
- Distribution. Positive and negative bus bars collect every cable in one place, and a DC fuse block feeds the small 12 V loads.
- Inverter (optional). Turns 12 V into 120 V AC for things that need an outlet. Size it for the biggest thing you'll really plug in.
- Monitor. A shunt-based battery monitor (like Redodo's $92.99 500 A unit) counts amps in and out, so the percentage you see is real.
The wiring order
Positive side, from the battery out:
- Battery positive
- Main fuse (Class T), within 7 inches of the terminal
- Battery switch
- Positive bus bar
- One fuse per branch at the bus bar: inverter, solar controller, DC-DC charger, shore charger, fuse block
Negative side: battery negative to the monitor's shunt, shunt to the negative bus bar, and every negative returns to that bus bar. Nothing but the shunt touches the battery negative, or the monitor can't see that current.
A diagram you can download
This is the full-time van from our planner, drawn by our wiring tool. Every cable is labeled with its gauge and fuse for the run lengths we assumed.
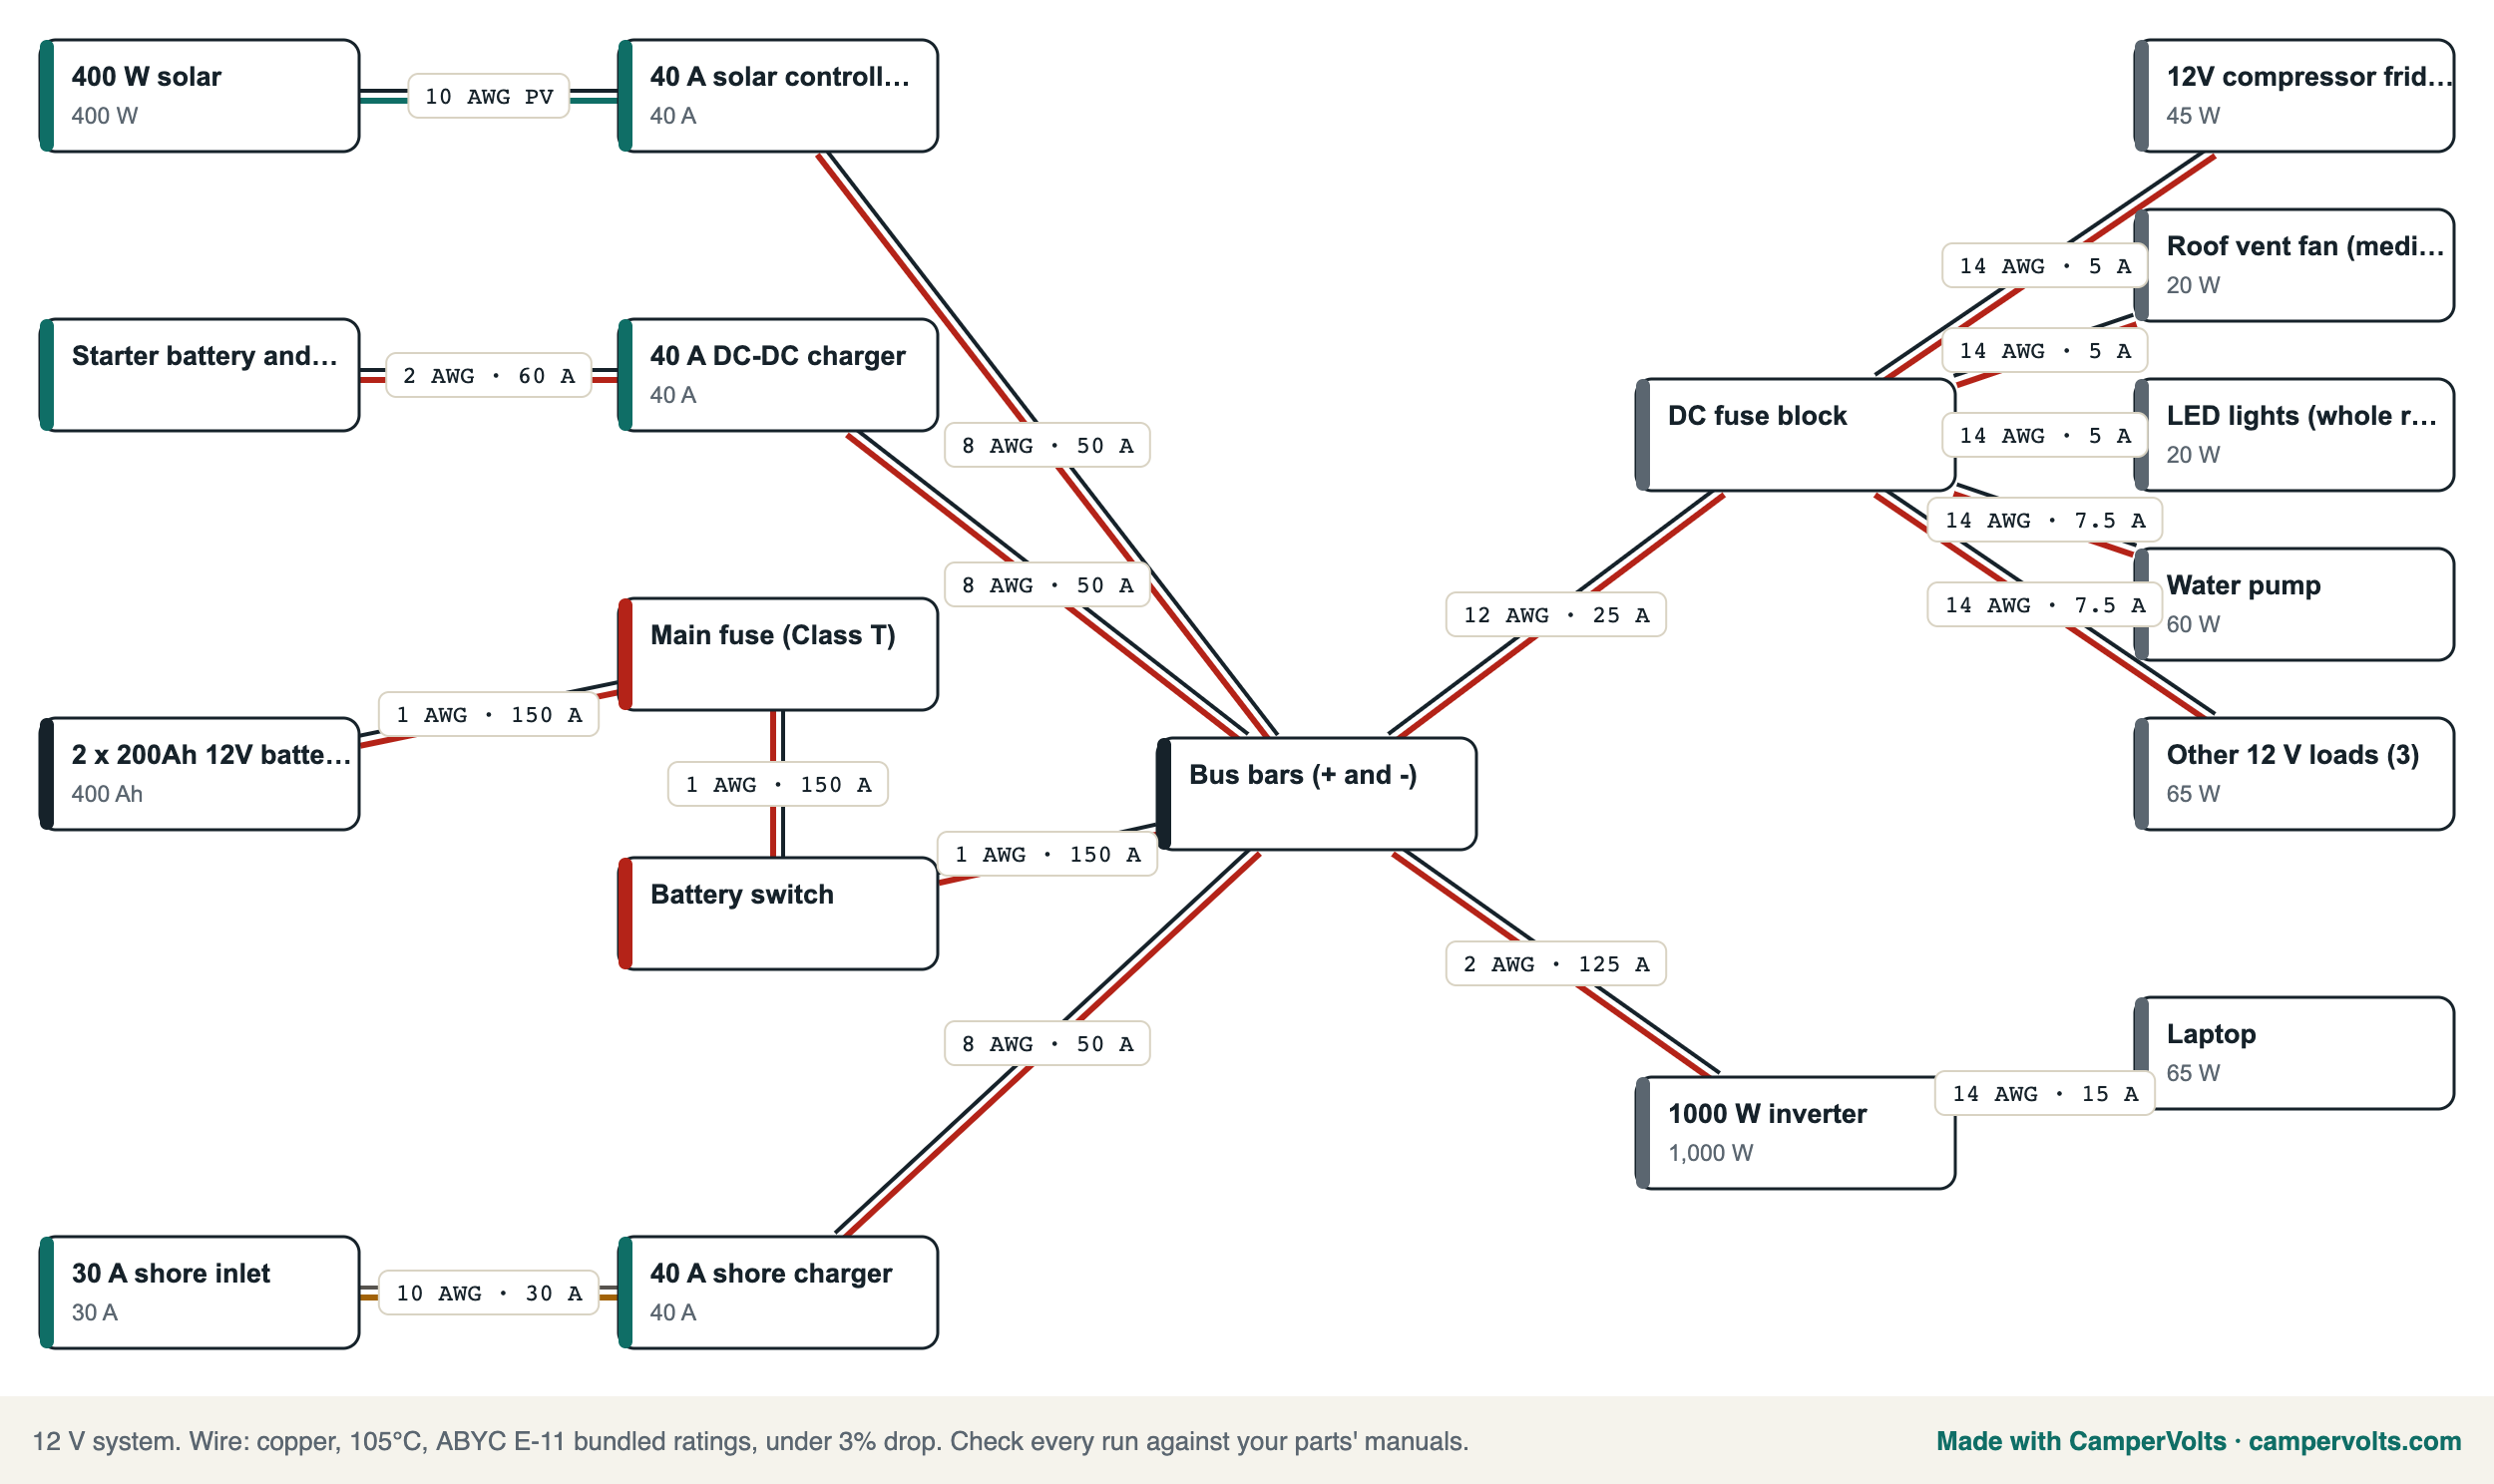
Your lengths and loads will differ. Run the planner with your own, then open the wiring tool: it starts from your plan.
What it costs
| Weekend van | Full-time van | |
|---|---|---|
| Daily use | 728 Wh | 1,731 Wh |
| Battery | 1 x 165 Ah | 2 x 200 Ah |
| Solar | 100 W | 400 W |
| Alternator charger | 40 A | 40 A |
| Inverter | None | 1,000 W |
| Priced parts | $1,011 | $2,136 |
Where people overspend
On the inverter. A 3,000 W unit needs cable as thick as a thumb and a bigger battery to feed it. If your AC loads are a laptop and a CPAP, a 1,000 W inverter, or none at all, does the job.
Safety first
Fuse every positive wire as close to the battery or bus bar as you can, and use the wire and fuse sizes from a standard table, not a guess. Boats should follow ABYC E-11; anything that touches 120/240 V AC should follow the NEC. Shore power, inverter-chargers and transfer switches belong to a qualified electrician or marine installer, or at least their inspection.
Run the power planner
Battery, solar, charger, inverter, every wire and fuse, and a priced parts list.
Draw your wiring
Drag parts onto a diagram and get gauge and fuse labels on every run.
Questions people ask
How much does a van electrical system cost?
For the parts we price, our planner's weekend van (fridge, fan, lights, pump, phones) comes to about $1,011; a full-time remote-work van with Starlink, a laptop and a diesel heater comes to about $2,136. Add cable, lugs, fuses, bus bars and a switch, which usually run a few hundred dollars more.
Do I need an inverter in my van?
Only for things that must plug into a household outlet. Fridges, fans, lights, water pumps, USB-C laptops and Starlink Mini can all run on 12 V. If you skip the inverter you save its cost, its idle draw and its heavy cable.
12 V or 24 V for a van?
12 V for almost every van: the vehicle, the fridge and nearly every RV accessory are 12 V. 24 V starts to make sense with an inverter of 3,000 W or more, or a battery bank above about 600 Ah, because it halves the current and the cable size.
Where does the main fuse go?
On the battery positive, as close to the terminal as you can, and ABYC E-11 asks for within 7 inches, with a few exceptions. With lithium, use a fuse that can interrupt a very large short-circuit current, such as a Class T.
Keep going
Wire gauge and fuse chart
12 V and 24 V wire sizes and fuses by amps and run length, from the ABYC tables.
How many solar panels
What 200, 400 and 600 W of flat roof panels make in your state, month by month.
DC-DC charger sizing
20 A or 40 A, smart alternators, and what an hour of driving puts back.
Best lithium battery for a van
Redodo and LiTime batteries by price per usable watt-hour, BMS current and cold-weather charging.